A beginner guide for toy photography. Those sections of the blog should give you a little advice when taking pictures with your toys and also showing some neat tips and tricks.
Part one: Basic lighting set up for your photos and the color difference between two different light sources.
When doing photography, light is one of the most important resources you will have at your disposal. And when doing toy-photography you often have to use artificial light sources such as lamps or a flashlight. It’s always fascinating to see, that you can create completely different results by just simply rearranging your lighting setup.

When I moved out from my old lodge where I did most of my previous photos I also abandoned my studio equipment. So basically all the figure photos I shot within the last 6 months were illuminated with simple desk lamps. And some of those photos looked really great, proving that professional light is not the only thing that defines a good picture. But since I started this blog I want to dig deeper into toy-photography. That’s why I reclaimed my old equipment this month.
The major difference between my old desk lamps and those studio bulbs are their color temperature. When shooting with very warm light such as desk lamp I had to crank the kelvin dial on my camera all the way down to the lowest setting, so that the colors in the picture won’t have that unpleasant yellow tint.

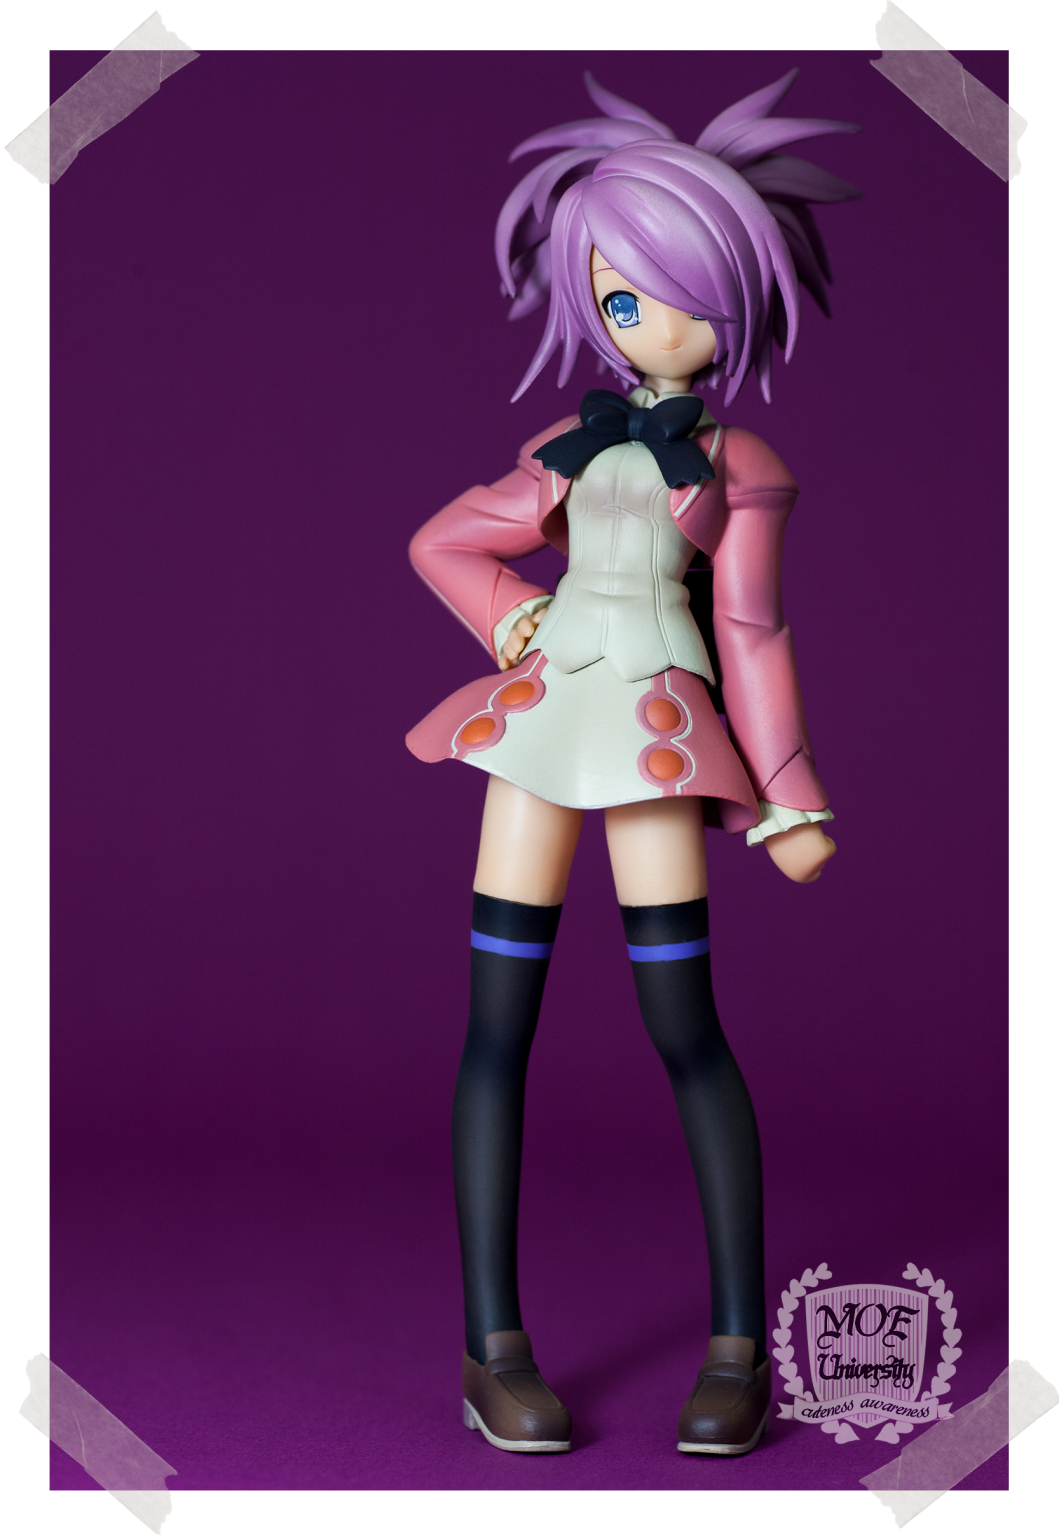
But my observations showed that there is still a difference between using cooler light in order to match a figures color and using light sources on the lower end of the kelvin scale and than having the picture adjusted in post-production. Below you can see a picture I took with two of my studio lights at roughly 5000 kelvin. The colors in the picture do resemble the colors of the figure quite well.

- A shot of Nagi using my old studio light at roughly 5000 Kelvin.
Then I replaced the studio lights with two of my desk lamps while setting the camera to the lowest possible kelvin setting (about 3000 kelvin). As you can see, even if the camera is trying adapting to the situation, the photo still has a warm tint that doesn’t resemble the figures real colors.

- The same setup as the first one but now with two of my desk lamps as lighting.
Of course, when working digital, choosing the exact color temperature isn’t that important anymore, since with the RAW format you can easily adjust this value later on. Therefore I edited the second picture so that it looks almost the same as the first one.

- The same picture as above, edited with Lightroom to match the 5000 kelvin shot.
But if you take a closer look on this side to side comparison you can see that the adjusted picture lost some quality and is a bit noisier. This of course is a result of the postproduction and the cameras sensors dynamic. If you want to have crisp and clear looking pictures, make sure to use cooler lights (5000 kelvin and above). It also helps to shorten your exposure time. Even with a low film speed (ISO) setting and a tripod, long exposure times will create some additional noise to your photo. It’s a good thing that studio lights not only have a much cooler light spectrum, they also will provide much more brightness in general.

- Left: The original 5000 kelvin shot / Right: The 3000 kelvin shot, adjusted by Lightroom
The second thing I want to address in this blog entry is the positioning of your light sources with two or more spots. To be honest when it comes to illumination I’m not that experienced and I always try to compensate this shortfall with elaborated compositions. But there are people who can create astonishing figure photos by just using light as one of their main elements. Take a look at Wieselheads blog for example. His figure portraits are genuinely good and he is doing a great job by using light to his favor.
When it comes to lighting, the setup for toy-photography doesn’t differ that much from a normal studio environment. The only advantage you will have is that your model is only at the scale of 1/8 or even smaller. So your light equipment can also be much smaller and therefore might be also much cheaper. In toy-photography the light of a simple flashlight or even your cellphone can be a much welcomed illumination.

- Using some reflectors to balance out the heavy backlight.
In a basic composition you will often have two light sources: The main light that enlightens the whole scenery and a directional light that highlights a specific area of your subject. Here I used a big 125 watt studio light as my main light and a smaller lamp as a directional light source.

- A very basic photo set up with an indirect main light and a spotlight for highlights.
The main light is diffused and the directional light is hitting the figure inclined from the front. I also used a piece of white cardboard to reflect some of the light on the figures back. Working with reflectors can vastly improve your results without using additional lights. And since most figures are so small a simple sheet of paper or a hand mirror will do this job just fine. In addition I used sheets of paper to soften the hard light coming from the lamps. And if you only want to spotlight a specific area of the figure, such as the face you can also use paper and create a funnel to focus the light a little bit more.
With this very basic setup I managed to set up a nice looking lighting. Even if the figure is just standing against a plain background it produced some color shades.

For the next attempt I also added an effect light and some glowing spheres from a chain of lights to the mix. As you can see it’s possible to mix different light sources and their color temperature in order to create interesting effects.

I hope you enjoyed this little lecture on how to set up your lights and how color temperature effect your photos. Now that I have my studio equipment back I’m looking forward to take even more figure photos.

Hi and thx for the friendly mention ;D,
Indeed it’s a pain to work with 3000K as main light source, a yellowish tint is quite annoying, fortunately LED technology improved since some years and a wide range of color temperatures became available. I nevertheless prefer studio equipment a little, although it’s not always necessary. I realized the advantage of simple reflectors a bit late, but since lightsources can’t always be placed full frontal of the figure its a big help, also to be creative with the lighting. I also am a big fan of effect lights in the background 😉
LikeLike
The restored colors probably differ sligthly due to metamerism of the materials and the wonderful world of trichromacy. ^^
LikeLike